Hướng dẫn cài đặt GlusterFS trên Ubuntu 20.04
BÀI VIẾT

Hướng dẫn cài đặt GlusterFS trên Ubuntu 20.04

5.4K
author Nguyễn Ngọc Đang - 2021-11-03 16:03:31 (GMT+7)

Giới thiệu

GlusterFS là 1 hệ thống tập tin mạng có khả năng mở rộng lên đến vài petabye và xử lý cho hàng ngàn máy khách. Đây là hệ thống quản lý dữ liệu phân tán mã nguồn mở. GlusterFS đặt các dữ liệu cần lưu trữ từ nhiều máy chủ khác nhau thành 1 vùng nhớ hay còn gọi là namespace. Nó phù hợp với các tác vụ cần nhiều dữ liệu như lưu trữ đám mây và truyền phát dữ liệu.

Bài viết này sẽ hướng dẫn cài đặt GlusterFS trên Ubuntu 20.04. Chúng ta sẽ sử dụng 3 máy chủ và 1 máy khách. Trong đó 3 máy chủ sẽ đóng vai trò là bộ lưu trữ để hình thành vùng nhớ. Trên mỗi máy chủ lưu trữ sẽ làm bản sao của máy chủ kia và các tập tin lưu trữ này sẽ được sao chép trên cả 3 máy chủ.

Trong bài viết này chúng ta sử dụng 3 máy chủ và 1 máy khách để cài đặt GlusterFS có thông tin như sau:

3 máy chủ có IP và hostname lần lượt là:

10.124.11.22: node1

10.124.11.19: node2

10.124.11.44: node3

1 máy khách có IP và hostname là:

10.124.11.53: client

Cập nhật hệ thống

Để đảm bảo rằng tất cả các phụ thuộc của GlusterFS đều được cập nhật, hãy thực thi lệnh bên dưới:

bash (root)
apt-get update && apt-get upgrade

Trong quá trình cập nhật hệ thống chúng ta chờ từ 5 phút đến 15 phút.

Cài đặt GlusterFS Server

Cấu hình file host

Điều kiện quan trọng đầu tiên chúng ta cần làm trước khi cài đặt GlusterFS trên tất cả server là cấu hình file host trên mỗi máy. Bằng cách sử dụng trình soạn thảo quen thuộc để tiến hành thêm các dòng sau. Cần tiến hành thay đổi IP và hostname cho phù hợp:

bash (root)
vi /etc/hosts

Tiến hành thêm các dòng bên dưới vào file.

/etc/hosts
10.124.11.22    node1
10.124.11.19    node2
10.124.11.44    node3
10.124.11.53    client

Cài đặt glusterfs-server trên ba server

Chúng ta tiến hành cài đặt glusterfs-server trên cả ba server bằng cáh thực thi lệnh bên dưới trên cả 3 server:

bash (root)
apt -y install glusterfs-server

Sau khi cài đặt thành công GlusterFS chúng ta sẽ tiến hành lệnh sau để GlusterFS khởi động cùng với hệ thống:

bash (root)
systemctl enable --now glusterd

Để kiểm tra trạng thái của GlusterFS

bash (root)
systemctl status glusterd
Kết quả
● glusterd.service - GlusterFS, a clustered file-system server
     Loaded: loaded (/lib/systemd/system/glusterd.service; enabled; vendor preset: enabled)
     Active: active (running) since Tue 2021-10-26 15:03:31 +07; 1min 5s ago
       Docs: man:glusterd(8)
    Process: 2795 ExecStart=/usr/sbin/glusterd -p /var/run/glusterd.pid --log-level $LOG_LEVEL $GLUSTERD_OPTIONS (code=exited, stat>
   Main PID: 2796 (glusterd)
      Tasks: 9 (limit: 4621)
     Memory: 4.6M
     CGroup: /system.slice/glusterd.service
             └─2796 /usr/sbin/glusterd -p /var/run/glusterd.pid --log-level INFO

Oct 26 15:03:28 node1 systemd[1]: Starting GlusterFS, a clustered file-system server...
Oct 26 15:03:31 node1 systemd[1]: Started GlusterFS, a clustered file-system server.
....

Kiểm tra phiên bản GlusterFS:
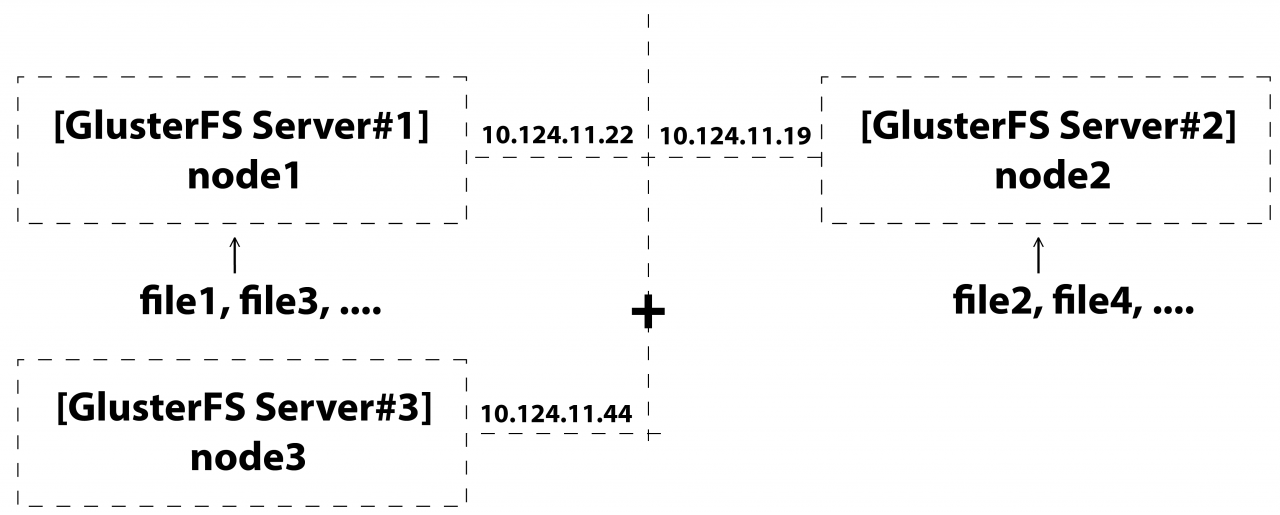
bash (root)
gluster --version
Kết quả
glusterfs 7.2
Repository revision: git://git.gluster.org/glusterfs.git
Copyright (c) 2006-2016 Red Hat, Inc. <https://www.gluster.org/>
GlusterFS comes with ABSOLUTELY NO WARRANTY.
It is licensed to you under your choice of the GNU Lesser
General Public License, version 3 or any later version (LGPLv3
or later), or the GNU General Public License, version 2 (GPLv2),
in all cases as published by the Free Software Foundation.

Cấu hình phân tán

Tại bước cấu hình phân tán này chúng ta sẽ sử dụng 2 server, trong ví dụ này chúng ta sẽ sử dụng là node1node2.

Mô hình trong cấu hình phân tán ở bước này như sau:

Tiến hành tạo thư mục GlusterFS Volume trên tất cảc 2 server node1node2

bash (root)
mkdir -p /glusterfs/distributed

Từ server node1 chúng ta cần thêm probe node2 và nhóm lưu trữ glusterfs

Chạy lệnh dưới đây:

bash (root)
gluster peer probe node2

Kết quả trả về như sau:

Kết quả
peer probe: success.

Kiểm tra trạng thái nhóm lưu trữ và danh sách bằng lệnh dưới đây:

bash (root)
gluster peer status
gluster pool list

Sau khi thêm node2 vào kết quả như sau:

Kết quả
Number of Peers: 1

Hostname: node2
Uuid: 88cbe948-ca92-4bcd-a136-ef43451e9855
State: Peer in Cluster (Connected)

Trong server node1 tiến hành tạo volume glusterfs phân tán với tên 123hostnode với 2 bản sao node1node2.

bash (root)
gluster volume create 123hostnode transport tcp node1:/glusterfs/distributed node2:/glusterfs/distributed force
Kết quả
volume create: 123hostnode: success: please start the volume to access data

Như vậy chúng ta đã tạo ra volume phân tán 123hostnode và khởi động 123hostnode và kiểm tra thông tin của nó tại node1

bash (root)
gluster volume start 123hostnode
gluster volume info 123hostnode
Kết quả
volume start: 123hostnode: success
Kết quả
Volume Name: 123hostnode
Type: Distribute
Volume ID: e79180aa-35a9-46b5-85f5-48c0dee4f4a5
Status: Started
Snapshot Count: 0
Number of Bricks: 2
Transport-type: tcp
Bricks:
Brick1: node1:/glusterfs/distributed
Brick2: node2:/glusterfs/distributed
Options Reconfigured:
transport.address-family: inet
storage.fips-mode-rchecksum: on
nfs.disable: on

Sau đây chúng ta sẽ thực thi lệnh sau để kiểm tra thông tin tại node2

bash (root)
gluster volume info 123hostnode
Kết quả
Volume Name: 123hostnode
Type: Distribute
Volume ID: e79180aa-35a9-46b5-85f5-48c0dee4f4a5
Status: Started
Snapshot Count: 0
Number of Bricks: 2
Transport-type: tcp
Bricks:
Brick1: node1:/glusterfs/distributed
Brick2: node2:/glusterfs/distributed
Options Reconfigured:
transport.address-family: inet
storage.fips-mode-rchecksum: on
nfs.disable: on

Cài đặt client GlusterFS

Để cài đặt GlusterFS client chúng ta thực thi lệnh sau:

bash (root)
apt -y install glusterfs-client

Thực hiện tạo 1 thư mục /mnt/glusterfs123hostclient khi sau khi cài đặt glusterfs-client thành công.

bash (root)
mkdir -p /mnt/glusterfs123hostclient

Tiến hành mount volume glusterfs phân tán 123hostnode vào thư mục /mnt/glusterfs123hostclient.

bash (root)
mount -t glusterfs node1:/123hostnode /mnt/glusterfs123hostclient

Sau khi tiến hành mount volume vào thư mục /mnt/glusterfs123hostclient thực hiện kiểm tra kết quả:

bash (root)
df -h /mnt/glusterfs123hostclient/
Kết quả
Filesystem          Size  Used Avail Use% Mounted on
node1:/123hostnode   94G  6.4G   85G   8% /mnt/glusterfs123hostclient

Nếu như chúng ta chỉ thực thi lệnh mount trên thì sẽ bị mất khi máy tính, VPS hoặc Server được khởi động lại.

Do đó cần thực hiện mount tự động khi máy tính, VPS hoặc Server được khởi động lại, thì cấn tiến hành thêm trực tiếp trên file /etc/fstab như sau:

bash (root)
echo "node1:/123hostnode /mnt/glusterfs123hostclient glusterfs defaults,_netdev 0 0" >> /etc/fstab 

Hoặc chúng ta có thể sử dụng trình soạn thảo văn bản yêu thích để mở file /etc/fstab sau đó thực hiện thêm dòng sau:

/etc/fstab
node1:/123hostnode /mnt/glusterfs123hostclient glusterfs defaults,_netdev 0 0

Khi đã thêm vào file /etc/fstab thì mount sẽ không bị mất khi khởi động lại máy tính, VPS hoặc Server.

GlusterFS + NFS-Ganesha

GlusterFS + NFS-Ganesha Server

Cài đặt NFS-Ganesha và tích hợp với GlusterFS để gắn Gluster Volume với giao thức NFS.

Các giao thức NFS được hỗ trợ bởi NFS-Ganesha là v3, v4.0, v4.1, pNFS.

Đầu tiên chúng ta cần tắt tính năng NFS trong Gluster trước

bash (root)
gluster volume get 123hostnode nfs.disable
Kết quả
Option                                  Value
------                                  -----
nfs.disable                             on

Nếu như nfs.disable: off, chuyển sang tắt bằng lệnh sau:

bash (root)
gluster volume set 123hostnode nfs.disable on
Kết quả
volume set: success

Nếu như NFS Server đang chạy, sử dụng lệnh sau để tắt:

bash (root)
systemctl disable --now nfs-server

Cài đặt và cấu hình NFS-Ganesha trên một node trong cụm GlusterFS thực thi lệnh sau:

bash (root)
apt -y install nfs-ganesha-gluster

Thực hiện cấu hình NFS-Ganesha

bash (root)
mv /etc/ganesha/ganesha.conf /etc/ganesha/ganesha.conf.org

Tiến hành tạo file /etc/ganesha/ganesha.conf và thực hiện thêm các dòng sau:

/etc/ganesha/ganesha.conf
# create new
NFS_CORE_PARAM {
    # possible to mount with NFSv3 to NFSv4 Pseudo path
    mount_path_pseudo = true;
    # NFS protocol
    Protocols = 3,4;
}
EXPORT_DEFAULTS {
    # default access mode
    Access_Type = RW;
}
EXPORT {
    # uniq ID
    Export_Id = 101;
    # mount path of Gluster Volume
    Path = "/123hostnode";
    FSAL {
        # any name
        name = GLUSTER;
        # hostname or IP address of this Node
        hostname="10.124.11.22";
        # Gluster volume name
        volume="123hostnode";
    }
    # config for root Squash
    Squash="No_root_squash";
    # NFSv4 Pseudo path
    Pseudo="/vfs123hostnode";
    # allowed security options
    SecType = "sys";
}
LOG {
    # default log level
    Default_Log_Level = WARN;
}

Tiến hành thay hostname, volumePath sang thông tin tương ứng với cấu hình của bạn.

Sau khi tiến hành thêm các dòng trên vào file /etc/ganesha/ganesha.conf thì thực hiện khởi động lại dịch vụ NFS-Ganesha

bash (root)
systemctl restart nfs-ganesha && systemctl enable nfs-ganesha

Thực thi lệnh sau để kiểm tra list:

bash (root)
showmount -e localhost
Kết quả
Export list for localhost:
/vfs123hostnode (everyone)

GlusterFS + NFS-Ganesha Client

Thực hiện cài đặt NFS-Ganesha Client

bash (root)
apt -y install nfs-common
bash (root)
mount -t nfs4 node1:/vfs123hostnode /mnt/glusterfs123hostclient/

Sau khi tiến hành mount volume vào thư mục /mnt/glusterfs123hostclient với chuẩn nfs4 thực hiện kiểm tra kết quả:

bash (root)
df -hT /mnt/glusterfs123hostclient/
Kết quả
Filesystem            Type  Size  Used Avail Use% Mounted on
node1:/vfs123hostnode nfs4   94G  6.4G   85G   8% /mnt/glusterfs123hostclient

Nếu như chúng ta chỉ thực thi lệnh mount trên thì sẽ bị mất khi máy tính, VPS hoặc Server được khởi động lại.

Do đó cần thực hiện mount tự động khi máy tính, VPS hoặc Server được khởi động lại, thì cấn tiến hành thêm trực tiếp trên file /etc/fstab. Chúng ta có thể sử dụng trình soạn thảo văn bản yêu thích để mở file /etc/fstab sau đó thực hiện chỉnh sửa dòng sau:

/etc/fstab
node1:/123hostnode /mnt/glusterfs123hostclient glusterfs defaults,_netdev 0 0

Sang dòng sau:

/etc/fstab
node1:/vfs123hostnode /mnt/glusterfs123hostclient nfs4 defaults,_netdev 0 0

Khi đã thêm vào file /etc/fstab thì mount sẽ không bị mất khi khởi động lại máy tính, VPS hoặc Server.

Thêm node (Bricks) vào GlusterFS

Ở bước này chúng ta sẽ tiến hành thêm node3 vào GlusterFS. Mô hình như sau:

Nếu như server chưa cài đặt thì chúng ta cần tiến hành cài đặt glusterfs-server như hướng dẫn tại đây

Thực hiện thêm một probe mới vào Cluster thực hiện lệnh sau:

bash (root)
gluster peer probe node3
Kết quả
peer probe: success.

Kiểm tra trạng thái nhóm lưu trữ và danh sách bằng lệnh dưới đây:

bash (root)
gluster peer status
gluster volume info
Kết quả
Number of Peers: 2

Hostname: node2
Uuid: 88cbe948-ca92-4bcd-a136-ef43451e9855
State: Peer in Cluster (Connected)

Hostname: node3
Uuid: 9dbecd6b-62a9-40c9-b676-85ee95248164
State: Peer in Cluster (Connected)
Kết quả
Volume Name: 123hostnode
Type: Distribute
Volume ID: e79180aa-35a9-46b5-85f5-48c0dee4f4a5
Status: Started
Snapshot Count: 0
Number of Bricks: 2
Transport-type: tcp
Bricks:
Brick1: node1:/glusterfs/distributed
Brick2: node2:/glusterfs/distributed
Options Reconfigured:
transport.address-family: inet
storage.fips-mode-rchecksum: on
nfs.disable: on

Tiến hành tạo thư mục GlusterFS Volume trên node mới:

bash (root)
mkdir -p /glusterfs/distributed

Thực hiện thêm node3 vào Volume:

bash (root)
gluster volume add-brick 123hostnode node3:/glusterfs/distributed force
Kết quả
volume add-brick: success

Xác nhận thông tin Volume bằng lệnh sau:

bash (root)
gluster volume info
Kết quả
Volume Name: 123hostnode
Type: Distribute
Volume ID: e79180aa-35a9-46b5-85f5-48c0dee4f4a5
Status: Started
Snapshot Count: 0
Number of Bricks: 3
Transport-type: tcp
Bricks:
Brick1: node1:/glusterfs/distributed
Brick2: node2:/glusterfs/distributed
Brick3: node3:/glusterfs/distributed
Options Reconfigured:
transport.address-family: inet
storage.fips-mode-rchecksum: on
nfs.disable: on

Sau khi đã thêm node3 thành công chúng ta tiến hành vào client kiểm ta dung lượng của GlusterFS

bash (root)
df -hT /mnt/glusterfs123hostclient/
Kết quả
Filesystem          Size  Used Avail Use% Mounted on
node1:/vfs123hostnode nfs4  141G  9.6G  127G   8% /mnt/glusterfs123hostclient

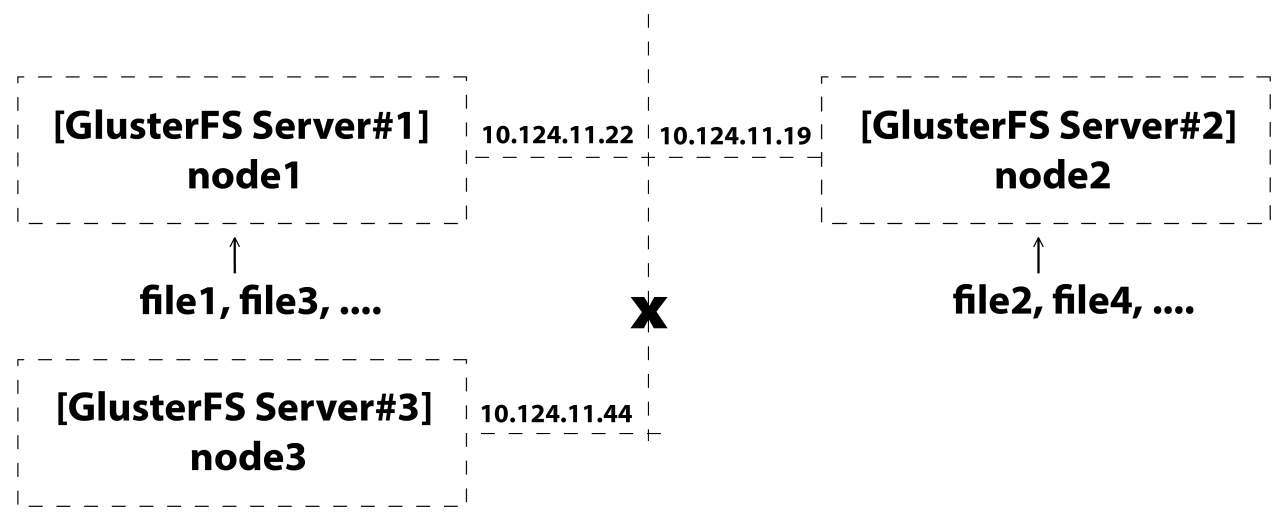
Gỡ node (Bricks) trên GlusterFS

Ở bước này chúng ta sẽ tiến hành gỡ node3 trên GlusterFS. Mô hình như sau:

Xác nhận thông tin Volume bằng lệnh sau:

bash (root)
gluster volume info
Kết quả
Volume Name: 123hostnode
Type: Distribute
Volume ID: e79180aa-35a9-46b5-85f5-48c0dee4f4a5
Status: Started
Snapshot Count: 0
Number of Bricks: 3
Transport-type: tcp
Bricks:
Brick1: node1:/glusterfs/distributed
Brick2: node2:/glusterfs/distributed
Brick3: node3:/glusterfs/distributed
Options Reconfigured:
transport.address-family: inet
storage.fips-mode-rchecksum: on
nfs.disable: on

Bắt đầu gỡ node3 khỏi Volume

bash (root)
gluster volume remove-brick 123hostnode node3:/glusterfs/distributed start
Kết quả
It is recommended that remove-brick be run with cluster.force-migration option disabled to prevent possible data corruption. Doing so will ensure that files that receive writes during migration will not be migrated and will need to be manually copied after the remove-brick commit operation. Please check the value of the option and update accordingly.
Do you want to continue with your current cluster.force-migration settings? (y/n) y
volume remove-brick start: success
ID: 6f31dc04-efad-4b28-a7cb-04a153b58902

Tiến hành kiểm tra trạng thái:

bash (root)
gluster volume remove-brick 123hostnode node3:/glusterfs/distributed status
Kết quả
 Node Rebalanced-files          size       scanned      failures       skipped               status  run time in h:m:s
                               ---------      -----------   -----------   -----------   -----------   -----------         ------------     --------------
                                   node3                0        0Bytes             0             0             0            completed        0:00:00

Sau khi đã kiểm tra trạng thái cần chuyển sang hoàn thành và cam kết xóa

bash (root)
gluster volume remove-brick 123hostnode node3:/glusterfs/distributed commit
Kết quả
volume remove-brick commit: success
Check the removed bricks to ensure all files are migrated.
If files with data are found on the brick path, copy them via a gluster mount point before re-purposing the removed brick.

Xác nhận thông tin Volume bằng lệnh sau:

bash (root)
gluster volume info
Kết quả
Volume Name: 123hostnode
Type: Distribute
Volume ID: e79180aa-35a9-46b5-85f5-48c0dee4f4a5
Status: Started
Snapshot Count: 0
Number of Bricks: 2
Transport-type: tcp
Bricks:
Brick1: node1:/glusterfs/distributed
Brick2: node2:/glusterfs/distributed
Options Reconfigured:
performance.client-io-threads: on
transport.address-family: inet
storage.fips-mode-rchecksum: on
nfs.disable: on

Sau khi đã gỡ node3 thành công chúng ta tiến hành vào client kiểm ta dung lượng của GlusterFS

bash (root)
df -hT /mnt/glusterfs123hostclient/
Kết quả
Filesystem          Size  Used Avail Use% Mounted on
node1:/vfs123hostnode nfs4   94G  6.4G   85G   8% /mnt/glusterfs123hostclient

Kiểm tra sao chép / phản chiếu

Chúng ta sẽ kiểm tra dữ liệu phản chiếu trên mỗi node. Tiến hành monut Volume glusterfs vfs123hostnode và mỗi server Glusterfs

Trên server node1:

bash (root)
mount -t nfs4 node1:/vfs123hostnode /mnt/glusterfs123hostserver

Trên server node2:

bash (root)
mount -t nfs4 node1:/vfs123hostnode /mnt/glusterfs123hostserver

Nếu như chúng ta chỉ thực thi lệnh mount trên thì sẽ bị mất khi máy tính, VPS hoặc Server được khởi động lại.

Do đó cần thực hiện mount tự động khi máy tính, VPS hoặc Server được khởi động lại, thì cấn tiến hành thêm trực tiếp trên file /etc/fstab. Chúng ta có thể sử dụng trình soạn thảo văn bản yêu thích để mở file /etc/fstab sau đó thực hiện chỉnh sửa dòng sau:

Với server node1:

/etc/fstab
node1:/vfs123hostnode /mnt/glusterfs123hostserver nfs4 defaults,_netdev 0 0

Với server node2:

/etc/fstab
node1:/vfs123hostnode /mnt/glusterfs123hostserver nfs4 defaults,_netdev 0 0

Chúng ta tiến hành quay lại client và vào thư mục /mnt/glusterfs123hostclient/ và thực hiện tạo 3 file file01_123host.txt, file02_123host.txtfile03_123host.txt

bash (root)
touch file01_123host.txt file02_123host.txt file03_123host.txt

Tiến hành kiểm tra file đã tạo:

Kết quả
total 8
drwxr-xr-x 3 root root 4096 Oct 30 16:01 .
drwxr-xr-x 3 root root 4096 Oct 30 10:21 ..
-rw-r--r-- 1 root root    0 Oct 30 16:01 file01_123host.txt
-rw-r--r-- 1 root root    0 Oct 30 16:01 file02_123host.txt
-rw-r--r-- 1 root root    0 Oct 30 16:01 file03_123host.txt

Kiểm tra lần lượt server node1node2 , chúng ta sẽ nhận được tất cả các tệp mà đã tạo từ client

bash (root)
ls -la /mnt/glusterfs123hostserver/
Kết quả
total 8
drwxr-xr-x 3 root root 4096 Oct 30 16:01 .
drwxr-xr-x 3 root root 4096 Oct 30 16:20 ..
-rw-r--r-- 1 root root    0 Oct 30 16:01 file01_123host.txt
-rw-r--r-- 1 root root    0 Oct 30 16:01 file02_123host.txt
-rw-r--r-- 1 root root    0 Oct 30 16:01 file03_123host.txt

Tất cả các file mà chúng ta tạo ra từ client sẽ được phân phối tất cả volume Glusterfs cho các node server.

Bài viết trên đã hoàn tất việc cấu hình và cài đặt GlusterFS trên Ubuntu 20.04

Chúc các bạn thành công!


Bạn có làm được theo hướng dẫn này không?

Bài liên quan

Hướng dẫn thiết lập đồng bộ hóa thời gian trên Ubuntu 22.04
Hướng dẫn cài đặt Docker trên Ubuntu 22.04
Hướng dẫn cài đặt Object Storage Server dùng MinIO trên Ubuntu 22.04

Object Storage

Chuẩn S3, không giới hạn băng thông

Object Storage

Thuê Server Riêng

Chi phí thấp, cấu hình cao

Thuê Server Riêng
Thông tin tác giả
Bình luận

Tính năng đang được phát triển

Đang tải bình luận
Liên hệ chúng tôi