Chào các bạn,
Bài viết hôm nay sẽ hướng dẫn các bạn cài đặt Mosquitto MQTT trên CentOS 7. MQTT là một dạng giao thức thiết kế để hỗ trợ các thiết bị IoT có thể giao tiếp với nhau với độ trễ thấp và độ tin cậy cao do giao thức này rất nhẹ và hỗ trợ xác thực giúp đảm bảo các Message đã được gửi tới người nhận thành công, như chúng ta vẫn hay reply cho người khác để họ biết rằng chúng ta đã nhận được tin nhắn của họ. Mosquitto là một server broker MQTT phổ biến và hỗ trợ đầy đủ các tính năng của giao thức MQTT, đồng thời cũng dễ sử dụng và cài đặt nữa.
Cài đặt Mosquitto
Cài đặt Epel repo
yum -y install epel-release
Thêm Mosquitto Repo vào hệ thống để luôn được cập nhật package mới nhất
wget http://download.opensuse.org/repositories/home:/oojah:/mqtt/CentOS_CentOS-7/home:oojah:mqtt.repo -O /etc/yum.repos.d/mosquitto.repo
Cài đặt Mosquitto từ Yum
yum -y install mosquitto mosquitto-clients
Enable và start Mosquitto
systemctl enable mosquitto
systemctl start mosquitto
Kiểm tra Mosquitto hoạt động bằng cách login vào server và mở 2 terminal để test MQTT sử dụng lệnh sau:
Terminal 1: mosquitto_sub -h localhost -t test
Terminal 2: mosquitto_pub -h localhost -t test -m "hello world"
Cấu hình mật khẩu cho Mosquitto
Chúng ta thực hiện tạo user và mật khẩu, sau đó lưu vào file /etc/mosquitto/passwd bằng lệnh sau
mosquitto_passwd -c /etc/mosquitto/passwd admin
Tiếp đến chúng ta sẽ thêm cấu hình cho Mosquitto sử dụng file này để xác thực khi sử dụng giao thức MQTT, mở file /etc/mosquitto/mosquitto.conf và thêm vào cuối file các dòng sau
allow_anonymous false
password_file /etc/mosquitto/passwd
Restart Mosquitto để cấu hình mới có tác dụng
systemctl restart mosquitto
Sau khi restart, để thực hiện gửi Message, chúng ta phải khai báo thêm User và Password trong câu lệnh như sau:
mosquitto_sub -h localhost -t test -u "admin" -P "password"

mosquitto_pub -h localhost -t "test" -m "hello world" -u "admin" -P "password"
Cài đặt SSL Let’s Encrypt cho Mosquitto
Đầu tiên các bạn cài certbot từ Yum
yum -y install certbot
Để chạy certbot, bạn cần allow traffic HTTP đi qua Firewall của hệ thống
firewall-cmd --permanent --add-service=http
firewall-cmd --reload
Chạy lệnh sau để request SSL cho domain cài đặt Mosquitto
certbot certonly --standalone --standalone-supported-challenges http-01 -d yourdomain.com
Cấu hình tự động gia hạn SSL sử dụng cronjob, dùng lệnh crontab -e và thêm vào dòng sau
15 3 * * * certbot renew --noninteractive --post-hook "systemctl restart mosquitto"
Tiếp theo, các bạn mở file config /etc/mosquitto/mosquitto.conf và thêm vào các dòng sau:
listener 1883 localhost

listener 8883
certfile /etc/letsencrypt/live/yourdomain.com/cert.pem
cafile /etc/letsencrypt/live/yourdomain.com/chain.pem
keyfile /etc/letsencrypt/live/yourdomain.com/privkey.pem
Do các file certificate được cấp phát dưới quyền root nên chúng ta cần phải chỉnh sửa Permission khi start dịch vụ để có thể đọc được các file .pem
Mở file /etc/systemd/system/multi-user.target.wants/mosquitto.service và xóa dòng sau
User=mosquitto
Lưu lại và reload Systemd
systemctl daemon-reload
systemctl restart mosquitto
Mosquitto vẫn sẽ chạy dưới quyền User mosquitto tuy nhiên sẽ Start bằng quyền Root, các bạn nhớ allow access cho các port của Mosquitto
firewall-cmd --permanent --add-port=8883/tcp
firewall-cmd --reload
Kiểm tra MQTT message qua port 8883 và SSL có hợp lệ với domain đã cấu hình chưa
mosquitto_pub -h yourdomain.com -t test -m "hello again" -p 8883 --cafile /etc/ssl/certs/ca-bundle.crt -u "admin" -P "password"
Cấu hình Mosquitto để chạy qua giao thức websocket
Mosquitto hỗ trợ giao thức websocket để các ứng dụng Javascript chạy trên nền web có thể thực hiện giao tiếp qua websocket, để cấu hình websocket cho Mosquitto, các bạn mở file cấu hình /etc/mosquitto/mosquitto.conf và thêm vào các dòng sau:
listener 8083

protocol websockets
certfile /etc/letsencrypt/live/yourdomain.com/cert.pem
cafile /etc/letsencrypt/live/yourdomain.com/chain.pem
keyfile /etc/letsencrypt/live/yourdomain.com/privkey.pem
Thực hiện Restart và add rule Firewall
systemctl restart mosquitto
firewall-cmd --permanent --add-port=8083/tcp
firewall-cmd --reload
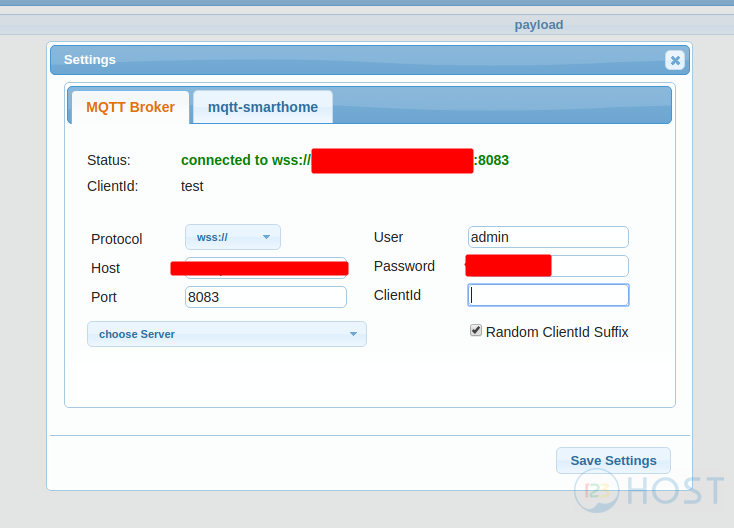
Để test Mosquitto websocket, các bạn có thể dùng trang web sau, nhập vào các thông tin của máy chủ và thực hiện kết nối, lưu ý chọn giao thức wss: , client-id các bạn có thể để mặc định.
Well done! chúc các bạn cài đặt Mosquitto thành công và sử dụng MQTT hiệu quả hơn với Mosquitto.


Leave A Comment?